Deploying a Vue.js app to Netlify
By now you’ve probably deployed a project to Netlify using their UI by linking a GitHub/GitLab project and setting up the necessary steps to build the app.’
What you may not know is that Netlify has a Node-based CLI tool that lets you deploy from the terminal.
Moreover, GitLab’s CI/CD pipelines provide 2,000 monthly CI pipeline minutes for free that we can use to automate our test & deploy process.
Create a new project
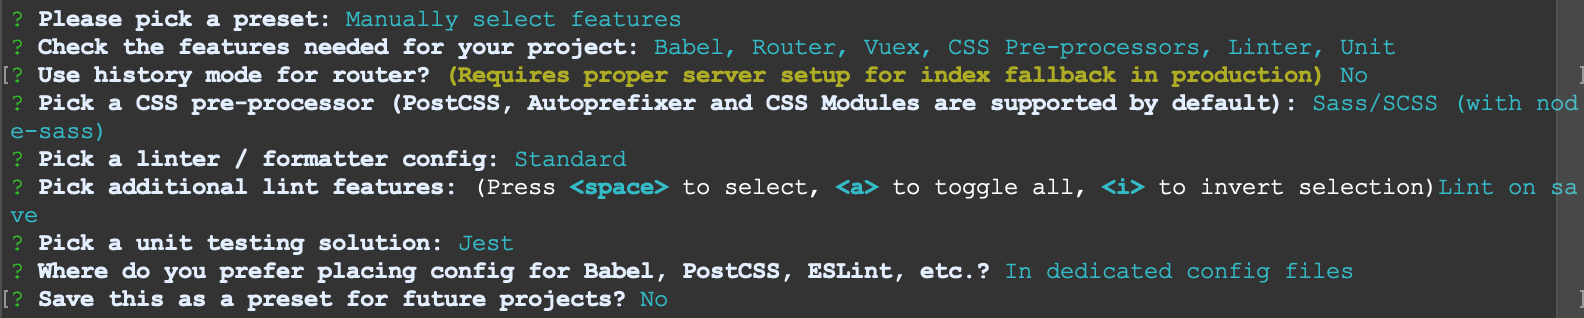
Or use an existing one. In this case, we’re creating a new one named vue_netlify_ci using vue create vue_netlify_ci.
Here’s the config I used:
Push it to a GitLab repo
Standard procedure.
Install netlify-cli globally
Run npm i netlify-cli -g and make sure it’s properly installed by typing in netlify -v. It’ll yield something like netlify-cli/2.11.10 darwin-x64 node-v10.15.3.
Command not found?
It’s possible that when you try to run netlify you’ll get a “Command not found” message. That’s most likely due to some issue related to how you installed Node+npm in the first place. To fix it you need to update you $PATH _env (for MacOS/Linux the process should be roughly equal. For Windows users, Google I guess?)
1. Look up the result of installing_ netlify-cli_, it should look something like:_
/usr/local/Cellar/node/8.7.0/bin/ntl -> /usr/local/Cellar/node/8.7.0/lib/node_modules/netlify-cli/bin/run
/usr/local/Cellar/node/8.7.0/bin/netlify -> /usr/local/Cellar/node/8.7.0/lib/node_modules/netlify-cli/bin/run
+ [email protected]
updated 1 package in 5.123s
In my case, netlify can be found within /usr/local/Cellar/node/8.7.0/bin/
_and that’s the line we need to add to our _.bash_profile. To do so, vim in to it using_vim ~/.bash_profile_and add the line_export PATH=/usr/local/Cellar/node/8.7.0/bin/:$PATH_(note that you need to change this depending on your output).
Save it and run
_source ~/.bash_profile_and netlify should now be accessible in your terminal.
Preparing Netlify for CI
Link your repo to a new Netlify project
Run netlify init --manual and follow these wizard steps:
- Select: Create & configure new site
- Give it a name (optional) (we’ll call it vue-netlify-ci)
- Pick your team, if any and press Enter to finish.
Note: if it’s your first time using netlify CLI, you’ll be prompted to authorize the connection to your account (it’ll open a browser window with the authorization UI).
After these, you’ll have your project created within Netlify but it won’t be deployed (because we haven’t told it how to do so yet).
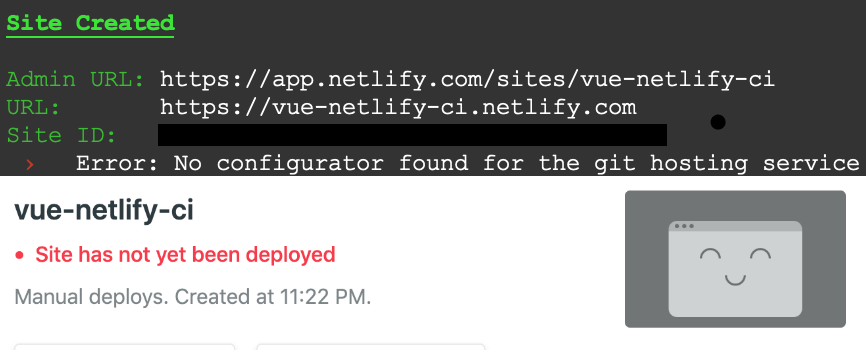
We now have a Site ID which we’ll need for our GitLab YAML instructions.
Generate a personal access token
If you’re logged in Netlify, click here to go straight to the right section. For reference, it’s located under User Settings > Applications.
Add a description to the token such as CI and keep it somewhere safe! **Once you exit that page with the generated token you won’t be able to retrieve it anymore.**If you lose it, you’ll need to generate a new one.
Setup Netlify’s config file
We can describe how Netlify will build and deploy your site using TOML markup language. In our case, simply create a file named netlify.toml under the project’s root directory with the following:
[build]
  publish = "dist"
netlify.toml
What’s happening here? We’re simply telling Netlify which directory contains the deploy-ready assets generated by the build.
(Note: In our case we are building the app using GitLab’s runners and deploying the bundle all together, whereas you’d normally have command = "npm run build" to tell Netlify to build the app first).
We now have an access token, the site’s ID and we’ve told Netlify how to handle the deploy process. Onto GitLab.
Preparing for GitLab CI/CD
GitLab’s CI/CD is pretty straight forward. If you push to a repo and it detects a .gitlab-ci.yml file within your project, it’ll use shared runners to run the scripts inside it according to the provided instructions.
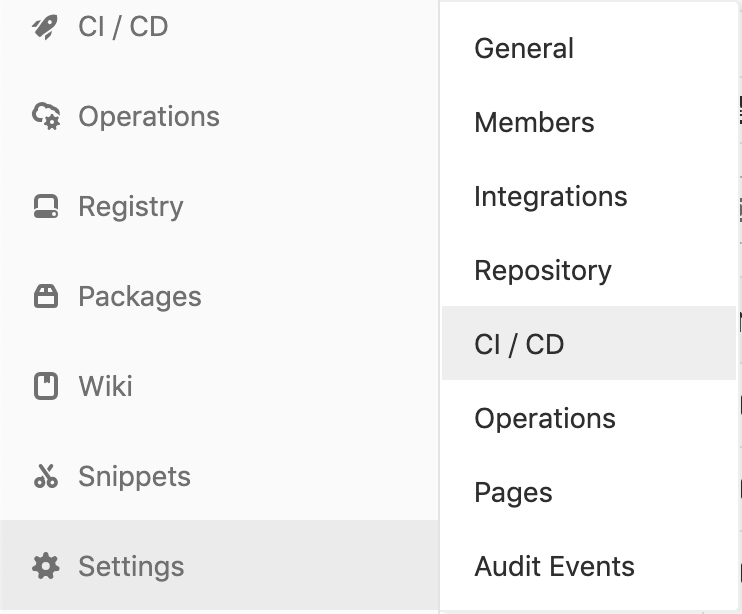
Before setting up the file, we need to setup environment variables so our .yml doesn’t expose any sensible data, namely the access token and site ID.
To do so, navigate to Settings > CI /CD and expand the Variables section.
Add in NETLIFY_AUTH_TOKEN and NETLIFY_SITE_ID, each with their respective values. (Tip: if you don’t recall your side ID, you can see it in your project root directory under .netlify/state.json).
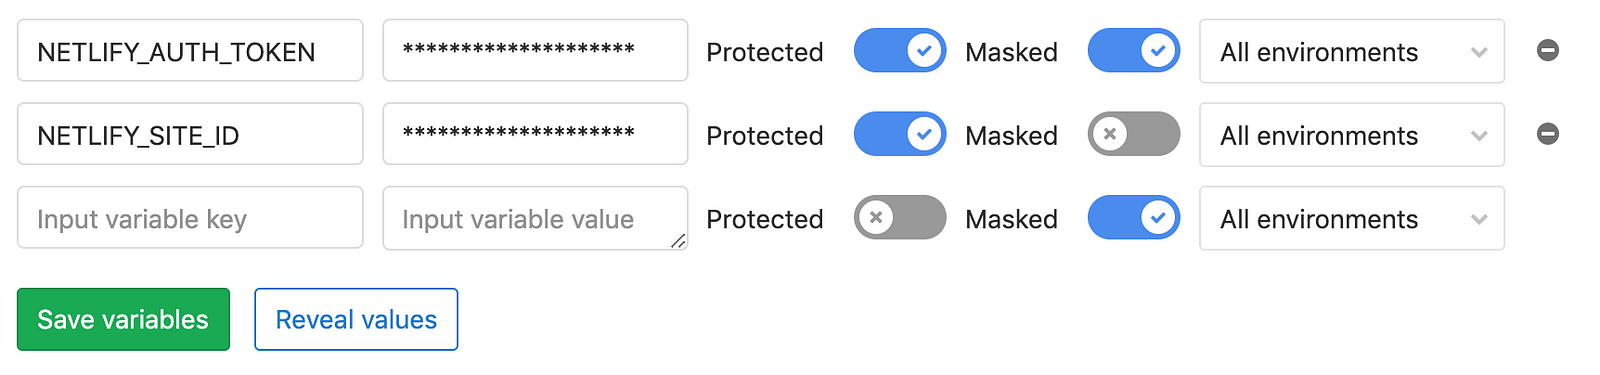
Save them, and we are now ready finally ready to add .gitlab-ci.yml
Defining the CI/CD pipeline
GitLab CI/CD pipelines are configured using a YAML file called .gitlab-ci.yml within each project.
In the project’s root directory, create a file called .gitlab-ci.yml and add the following:
image: node:10.15.3

cache:
  untracked: true
  paths:
    - node_modules/

stages:
  - setup
  - test
  - build
  - deploy

setup:
  stage: setup
  script:
    - npm ci
  only:
    - master

test:
  stage: test
  script:
    - npm run test:unit
  only:
    - master

build:
  stage: build
  script:
    - npm run build
  artifacts:
    paths:
      - dist
  only:
    - master

deploy:
  stage: deploy
  script:
    - npm i -g netlify-cli
    - netlify deploy --site $NETLIFY_SITE_ID --auth $NETLIFY_AUTH_TOKEN --prod
  dependencies:
    - build
  only:
    - master
.gitlab-ci.yml
This sets up a 4-stage pipeline that will 1) setup the project’s dependencies; 2) run our tests; 3) build the app; 4) deploy it to Netlify.
Some details about what is being used:
image: indicates which Docker to use for the jobs.
cache: allows us to speed up invocations of subsequent runs of a given job, by keeping dependencies, in this case node_modules. More on caching here.
artifacts: specifies files/directories we want to make available to following jobs.
dependencies: to be used in conjunction with artifacts. Allows us to use the result of the build stage (the dist folder) into the deploy stage.
npm ci: “npm ci bypasses a package’s package.json to install modules from a package’s lockfile […] offering massive improvements to both the performance and reliability of builds for continuous integration / continuous deployment processes”.
netlify deploy: deploys our site to Netlify, specifically: –site $NETLIFY_SITE_ID and –auth $NETLIFY_AUTH_TOKEN indicate the site we want to deploy to and authenticate us to deploy (using the CI/CD env variables we set up earlier). –prod indicates we want to deploy to production.
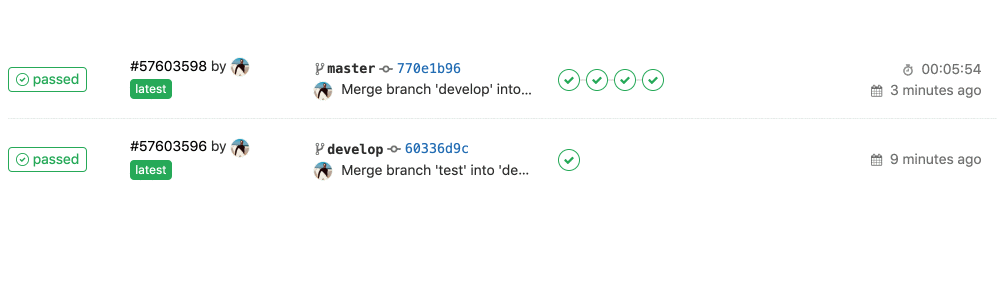
Result: does it blend?
Finally, add and commit the files andgit push (we’ve been working on the master branch. Ideally you would push to a separate branch and then PR+Merge into master. Only changes to master affect the CI pipeline).
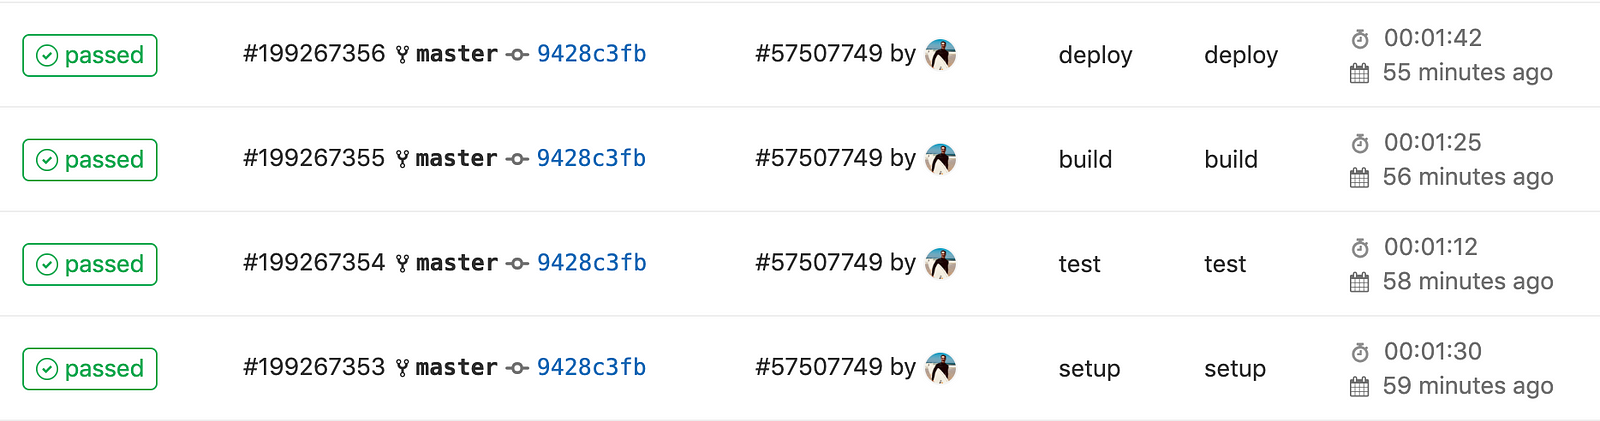
As soon as you push/merge to master, GitLab will trigger its runners and execute the pipeline.

Within your GitLab project, Navigate to CI/CD > Pipelines or CI/CD > Jobs to view in detail the status of each stage. If you get an error, be sure to click that job and look at the logs to understand what’s the issue.
Bonus: adding a staging preview
You know what’d be cool? Having the ability to preview new features on a separate deploy. Netlify has the option to deploy previews for each PR/MR when you link your repo as you would normally using the UI.
Unfortunately for us, it seems that it is not possible as of now to automate our deployment solely using our CI pipeline and/or Netlify’s CLI, so we’ll do differently_._
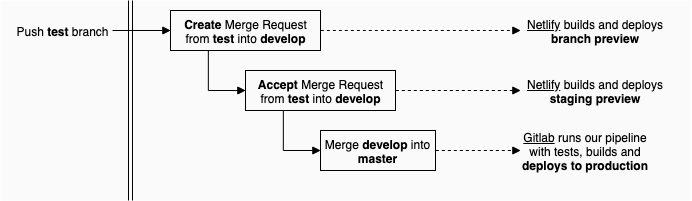
At the end of this, we’ll have a flow looking like this:
Create a project in Netlify
Create a new project in Netlify which will host the staging as well as merge requests’ previews. We’ll name it by prepending staging– to the production’s name, so it looks like staging-vue-netlify-ci.netlify.com. This is just to help distinguish both projects, you can use any naming you want.
Link the staging project to the repo
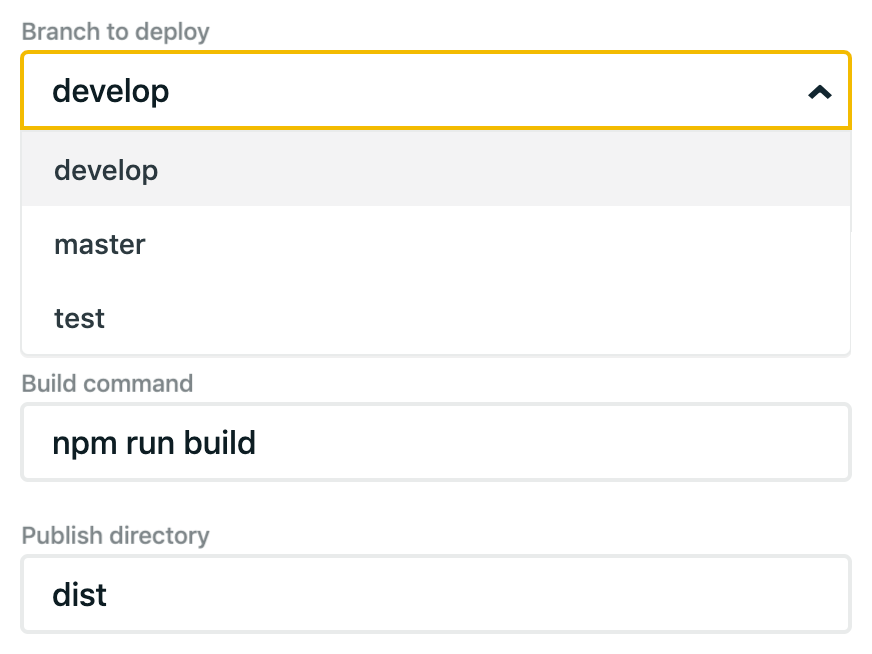
After selecting the project, select the develop branch which will be responsible for representing our staging preview.
Define the build command as npm run build and set the publish directory to dist.
Once you save it, Netlify will watch the develop branch and automatically build MR previews and production builds(which in this case production is treated as our staging. Real production is handled by our own pipeline remember?).
Create Merge Request into Develop
Remembering the flow above, you can generate as many deploys you want:
- one for per each branch that has a merge request into develop (ideal to quickly test features, hypothesis, quick showcase);
- one for the develop branch which acts as our staging environment;
And we get to keep using our own CI pipeline to the apply tests when merging into master. Of course you could change this whole flow to accommodate your needs.
An extra advantage of setting it up this way is that the build from our MR previews and develop deploys are all handled by Netlify, meaning we don’t get to waste CI minutes provided by GitLab. 👌
Next steps
As you can see, it’s pretty easy to setup a continuous integration & delivery pipeline to host a Vue.js app on Netlify using GitLab.
Optimizing pipeline time
Keep in mind that as the app gets new features and as you add more testing, the stages of the CI/CD pipeline will take longer and longer to be completed. It’s important to keep it fast not only for agile flows but also for cost reasons, as GitLab only provides 2k free minutes for CI/CD per month⏱️.
I’m by far no expert in using .gitlab-ci.yml configs and I’m sure the times above can be considerably reduced. This article by Wes Cossick details some ways to speed up the pipeline’s execution time. I’ll review this article with benchmarks and improvements as I improve my projects’ pipelines.
Repo & Resources
These provided config files here should be enough, but if you want to have a look at the repository (featuring Netlify’s deploy status badge) you can grab it here (https://gitlab.com/mstrlaw/vue_netlify_ci).
Resources / Reading material:
- Vue.js deployement general guidelines
- Creating and Using GitLab Pipelines
- netlify.toml reference
- .gitlab-ci.yml reference
Edits:
- Added the “Bonus” section explaining how to have an extra staging project linked to Netlify;
- Grammar & typos;
✅30s ad
☞ VueJS V1 Introduction to VueJS JavaScript Framework
☞ Getting started with Vuejs for development
☞ Vuejs 2 + Vuex + Firebase + Cloud Firestore
☞ Building Applications with VueJs, Vuex, VueRouter, and Nuxt
☞ Ethereum and Solidity: Build Dapp with VueJS
☞ Learn Web Development Using VueJS
Suggest:
☞ Web Development Tutorial - JavaScript, HTML, CSS
☞ Javascript Project Tutorial: Budget App
☞ JavaScript Programming Tutorial Full Course for Beginners
☞ E-Commerce JavaScript Tutorial - Shopping Cart from Scratch