React and Node with JSON Web Token for Authentication

Over the the past few months, I’ve been scouring the web, looking specifically for the ideal solution to authenticating a user in React and keeping guest users out of private, logged-in only pages. What an adventure… first with Passport.js, which is honestly a great solution, but I couldn’t help but feel like there’s a better, more React friendly option. I was right. Enter JWT or better known as JSON Web Tokens. This option, along with bcrypt will allow you to create a fairly simple React Higher Order Component(HOC) in tandem with a neat group of helper methods that will handle all the authentication for you, no matter where the user is in the app. In this article I’ll be walking you through creating a template with all the above mentioned goodies so that you can finally move on from this hair pulling nightmare that goes by the name of Authentication. My Project will be made up of a Node/Express server using Sequelize and a React app built initially with ‘creat-react-app’.
Starter Files:
jwt_react_node_starting_template
This project will start you off at the beginning of this tutorial with some boilerplate code.
Once you’ve forked or cloned the repo above, you’ll need to ‘npm install’ in two places, one for the node server and the other for the react app. The first place is at the root directory, then the second after you ‘cd client’. If you run ‘npm run startboth’ you should see the following screen:

You should at this point have basic navigational capabilities but not much going on at this point… Time to make it work! By the way, we’ll be working in the client folder for now until specified otherwise.
- For the sake of being able to right them once, we’ll put all of our authentication helper methods together in one file. These would be things like login, logout, isLoggedIn and many other very useful methods. So what we’ll do is create a new file inside the ‘client/src/components’ directory named “AuthHelperMethods.js”.
- Add the following import:
import decode from 'jwt-decode'
That will allows us to later decode the JSON Web Token and read it.
3. Now let’s add our first method, Login:

You’ll notice a couple of methods in here that we have not yet created and your IDE is freaking out. It’s okay, those will be created later in the file.
Sooo what’s going on here?
We write login to accept two arguments, ‘username’ and ‘password’ which are then going to be passed to our fetch method (hasn’t been created yet but basically sends our username and password to the server for verification), and lastly store our result in a token using ‘this.setToken’. Not too bad right? So now that you’ve written the first helper method, you can pretty much see what this class is going to look like. Paste the following methods under ‘login’:
The Code:
Okay so what have we added?
- loggedIn() : This method creates a variable called ‘token’ and assign it the value returned by ‘this.getToken()’ which does exactly what is sounds like: Gets the token that is stored in localStorage.
- isTokenExpired(token): Will check to see if the token passed to it is expired. Notice that we use the ‘decode’ method.
- setToken(idToken) & getToken(): Will allow you to set and get a token when needed.
- logout(): Log the user out and remove the token from localStorage.
- getConfirm(): Get the saved data that has been stored in the webtoken.
- fetch(url, options): Typical fetch except for being able to set the headers prior to sending it off to the server.
- _checkStatus(response): Simple error method.
Woohoo! Step One Complete!

Our Higher Component(HOC)
With The AuthHelperMethods all done and ready for duty, we can start building our Higher Order Component. This is a function that returns the component it’s been passed after it does some logic. Let’s begin with creating a new file named ‘withAuth.js’ in the ‘client/src/components’ directory.
Paste the following code into it:
Explanation
We start off exporting a function ‘withAuth’ that has an argument ‘AuthComponent’, which is the Component we want secured.
Check Logged In
- ComponentDidMount() does most of our heavy lifting. If the user is not logged in, we instantly redirect them to the login page. Otherwise, we make an attempt to get the information that is stored in the token and save it in the state.
Render the Secure Component
- If all is well, the componentDidMount() method should have set
this.state.loading === true;and the render() lifecycle method will be allowed to render the Authenticated Component.
That’s it! Now for App.js…
Okay so our Authentication Higher Order Component is ready to be used. Let’s start with implementing it in the App.js. We will import the ‘withAuth’ component into App.js and then wrap App.js when exporting it. First, we’ll go ahead and import the following:
/* Once the 'Authservice' and 'withAuth' componenets are created, import them into App.js */
import AuthHelperMethods from './components/AuthHelperMethods';
//Our higher order component
import withAuth from './components/withAuth';
Now we can wrap the App during export like so:
export default withAuth(App);
Next, let’s finish up our App.js file by using our AuthHelperMethods constructor to create a new instance at the top of the class, and using it in the _handleLogout() method:
/* Create a new instance of the 'AuthHelperMethods' component at the top of the class*/
Auth = new AuthHelperMethods();

/* Add the following into _handleLogout*/
_handleLogout = () => {
this.Auth.logout()
this.props.history.replace('/login');
}
Login.js
Now we’ll move on to the Login.js… almost done!
Again the first thing we want to do is import AuthHelperMethods and create a new instance of it at the top of the class. Then in the _handleFormSubmit() we’ll go ahead and add the following code:
So what we’re doing here is using the login helper method to check the username and password against the database. If the res === false then we alert the user that the credentials are incorrect, otherwise, redirect the user to the ‘/’ route.
Now we’ll just add this into the componentWillMount() to redirect a user from this page if they’re already logged in:
if (this.Auth.loggedIn()){
  this.props.history.replace('/');
}
Signup.js
Lastly, we have our Signup page…
Add import AuthHelperMethods from './components/AuthHelperMedothds'; to the top of Signup.js and add Auth = new AuthHelperMethods(); to the top of the class.
Now add the following code to the ‘handleFormSubmit()’ method:
All Done!
Well not quite… We finished our client side code, but now we have the server side to finish up next.
Server Side
App.js
- Typically in a bigger project, you would store your routes in a separate file elsewhere but in this case I’m keeping the routes within the App.js file for the sake of simplicity. We’ll have three routes, one for login, one for signup, and the last one for a simple auth check. Another task for App.js is to generate the JSON web token. Just a reminder, we want to make sure that the App.js that we’re in is the one found in the root directory of your project.
Explanation
At the top, we want to import the following:
var bcrypt = require('bcrypt');
const jwt = require('jsonwebtoken');
const exjwt = require('express-jwt');
brcypt will allow us to encrypt and decrypt the passwords.
jsonwebtoken will handle signing the token before sending it to the client.
express-jwt sets the server secret to verify the client tokens.
Next we set our auth headers:
app.use((req, res, next) => {
res.setHeader('Access-Control-Allow-Headers', 'Content-type,Authorization');
next();
});
Set up our server secret:
const jwtMW = exjwt({
secret: 'keyboard cat 4 ever'
});
The secret string here can be anything you like. For this example it’ll be ‘keyboard cat 4 ever’.
Signup Route Setup:
app.post('/signup', (req, res) => {
  const { username, password } = req.body;
  const saltRounds = 10;
  bcrypt.hash(password, saltRounds, function (err, hash) {
    db.user.create({
      username: username,
      password: hash
    }).then((result) => {
      console.log("User created: ", result);
      res.json("user created!");
    })
  });
})
When the client hits our signup route, we want to do a couple of things. First, we hash the password that was sent over in the request. The bcrypt hash method takes in two parameters, the desired password and the amount of salt rounds that it should go through before passing a hash to the callback. A hash is basically a jumbled up version of your password that ends up being more tedious to decrypt. Once the hash is received, the callback will create a user with the username sent from the client and the hash generated by bcrypt.
Login Route Setup
// app_login_route.js
app.post('/log-in', (req, res) => {
  const { username, password } = req.body;
  console.log("User submitted: ", username, password);

  db.user.findOne(
    {
      where: { username: username }
    })
    .then((user) => {
      console.log("User Found: ", user);
      if(user === null){
        res.json(false);
      }
      bcrypt.compare(password, user.password, function(err, result) {
        if(result === true){
          console.log("Valid!");
          let token = jwt.sign({ username: user.username }, 'keyboard cat 4 ever', { expiresIn: 129600 }); // Signing the token
          res.json({
            sucess: true,
            err: null,
            token
          });
        }
        else {
          console.log("Entered Password and Hash do not match!");
          res.status(401).json({
            sucess: false,
            token: null,
            err: 'Entered Password and Hash do not match!'
          });
        }
      });
    })
});
When the client hits the login route, before even checking the password, check to see if the username exists in the database. If it does, check to see if the password matches the hash that was stored for that user. How do we do that? We simply use another wonderful method provided by the bcrypt package called bcrypt.compare. First parameter is the password provided by the client, Second parameter is the hash found in the database. The result in the callback is a simple true or false. If result === true then we can proceed to use JSONwebtoken package to create a token and send it back to the client in the response. Otherwise, we send back a response carrying an error message.
The root route:
app.get('/', jwtMW /* Using the express jwt MW here */, (req, res) => {
  console.log("Web Token Checked.")
  res.send('You are authenticated'); //Sending some response when authenticated
});
Setting up the root route in this fashion will fire off the jwtMW middleware every request to the root route.
Now just modify the config file!
Woohoo! We’re so close to having a functional authentication app… we have ONE MORE THING, the config.json. This is what is should currently look like:
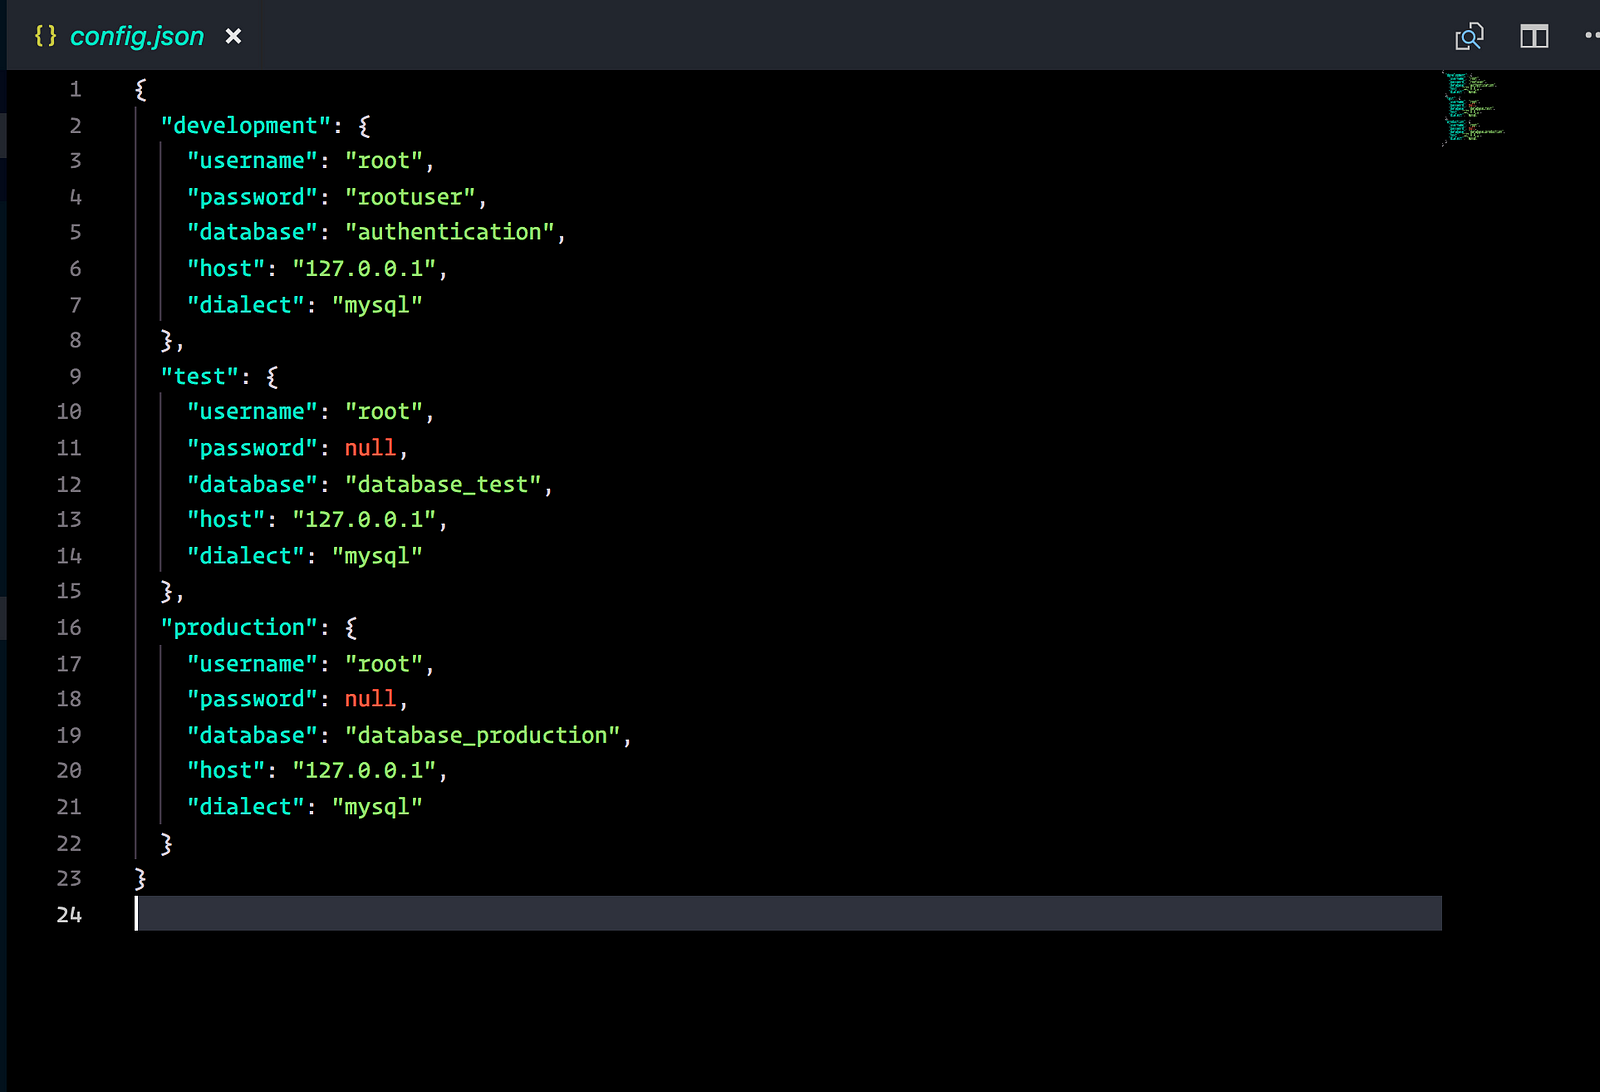
Replace the username and password values to those of your own root sql server.

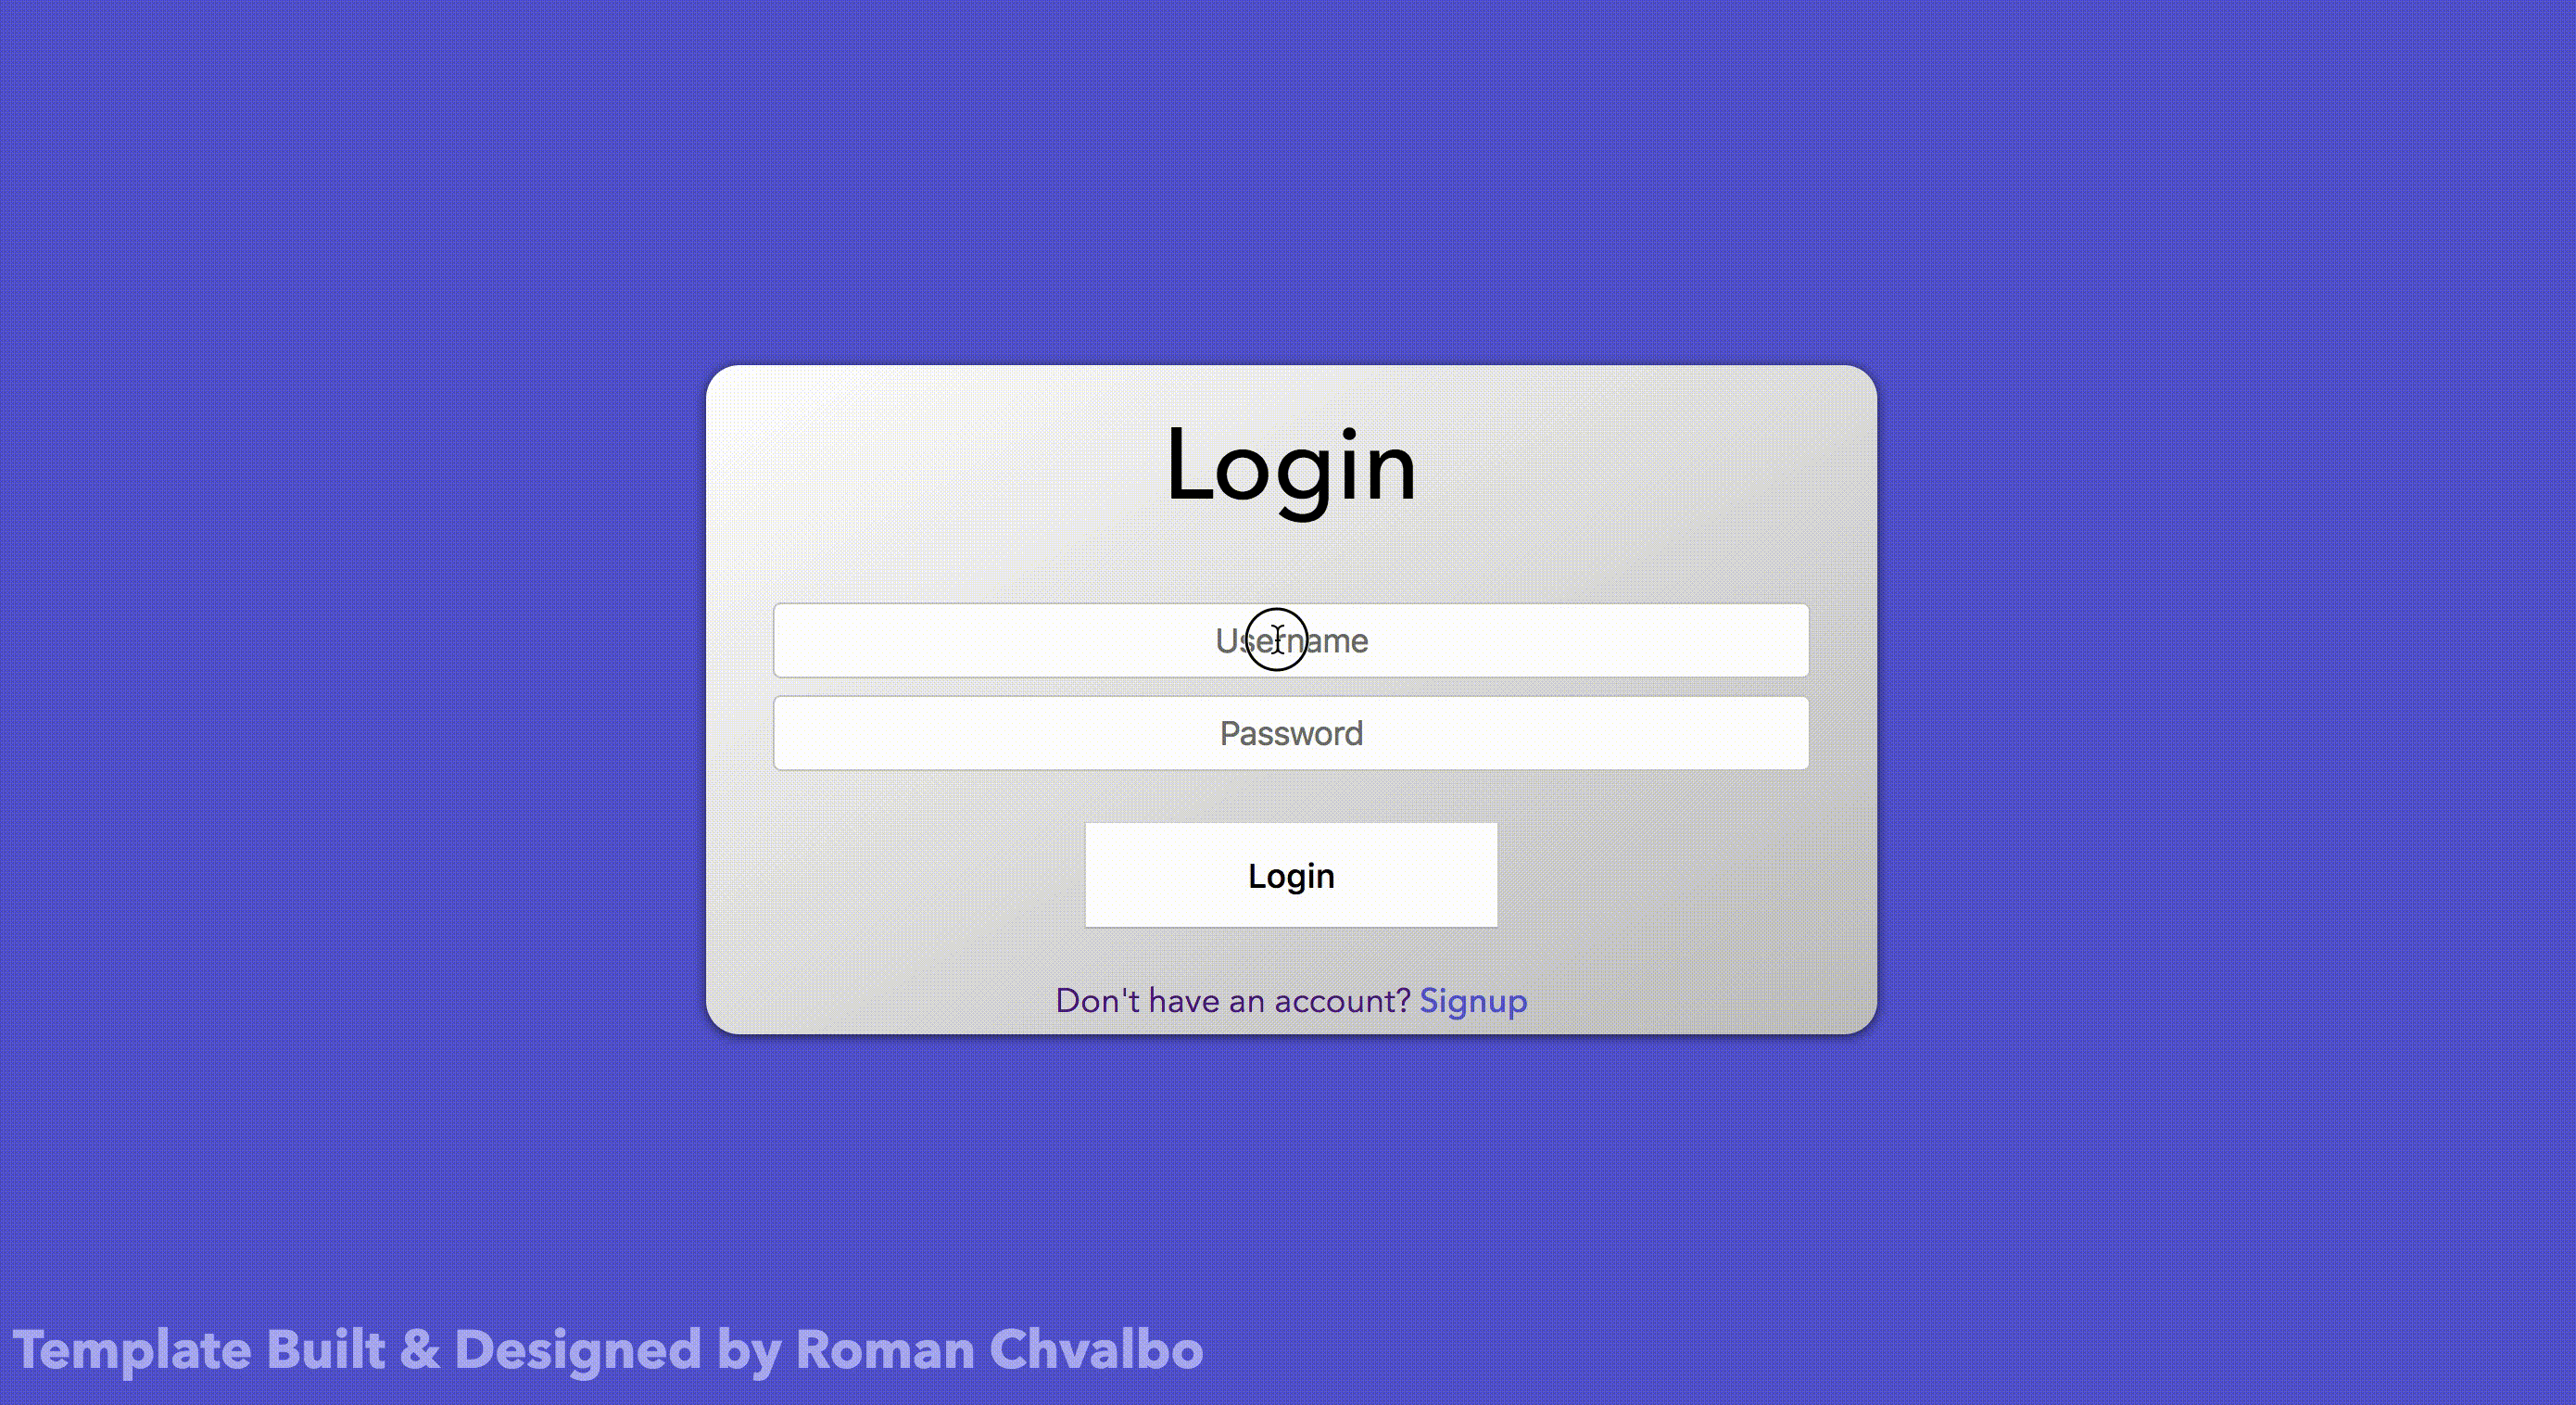
Looks like we’re done! Time to test this thing out, run npm run startboth in your terminal, you should see this:
Congrats! Now you have a basic understanding of authentication using React and JSON Web Tokens along with node server side setup. Take a look at the finished code below:
https://github.com/rchvalbo/jwt_react_node_starting_template_complete
Thanks for reading and good luck!
Recommended Courses:
☞ Build Realtime Apps | React Js, Golang & RethinkDB
☞ React: Learn ReactJS Fundamentals for Front-End Developers
☞ Learn ReactJS: Code Like A Facebook Developer
☞ Learn React JS from scratch: Create 7 projects
Suggest:
☞ Getting Closure on React Hooks
☞ JavaScript for React Developers | Mosh
☞ React Node.js Booking App Full Tutorial | MERN Stack Reservation App (JWT, Cookies, Context API)
☞ React + TypeScript : Why and How
☞ React Node.js Video Sharing App Full Tutorial (Redux, JWT, Cookies) | MERN Stack Youtube Clone
☞ E-Commerce JavaScript Tutorial - Shopping Cart from Scratch