Upload file to S3 with Laravel and Vue.js

If you are interested in joining Employbl as a candidate click here. For employer access to browse approved candidates click here.
About Employbl
Employbl is a talent marketplace. Candidates apply to join. I generally approve candidate applications if the candidate is authorized to work in the United States and has a background or clear interest in Software Engineering, Digital Marketing, Design or Product Management.
Companies are allowed to join Employbl and browse talent if they have a physical office in the Bay Area and recruit directly for positions they’re hiring for. Employbl isn’t built for third party or agency recruiters. If recruiters have a company email address for the company they’re recruiting for they’re good to go to start hiring from the Employbl network!
Resumes are the bread and butter recruiters use to evaluate candidates. In this post I’m going to add the ability for candidates to upload and feature their resume on their Employbl profile.
Step 1: Create the frontend form in Vue.js
The update profile information form is in a Vue.js component called ProfileForm.vue. That form sends an asynchronous POST request via the axios npm library. This is the first thing candidates see after they login to their account.
I’m adding a new HTML input field and Vue component method that allows users to upload their resume. Here’s the code to do that:
UploadResume.vue
<template>
    <div class="row text-center">
        <div class="col-md-12 mb-3">
            <label>Upload your resume</label>
            <small>(.pdf or .docx file please)</small>
        </div>
        <div class="col-4 offset-4 text-center mb-3">
            <!-- Upload resume button. Trigger function on browser file upload -->
            <input type="file" name="resume" @change="uploadResume" class="form-control-file">
        </div>
        <!-- Render resume to screen if there is one -->
        <div class="col-12">
            <iframe v-if="resume" :src="'https://s3-us-west-1.amazonaws.com/employbl-production/' + resume"
                    width="800px" height="600px" ></iframe>
            <p v-if="!resume" class="text-danger">You have not uploaded a resume yet</p>
            <p v-if="resume" class="text-success">Resume uploaded successfully</p>
        </div>
    </div>
</template>
<script>
  import _ from 'lodash';
  export default {
    props: {
      'candidate': {
        required: true,
        default() {
          return {};
        }
      }
    },
    data() {
      const candidate = JSON.parse(this.candidate);
      return {
        resume: _.get(candidate, 'resume_file_path') || null,
        candidateInfo: {
          id: _.get(candidate, 'id')
        }
      };
    },
    methods: {
      uploadResume(e) {
        let reader = new FileReader();
        let formData = new FormData();
        let files = e.target.files || e.dataTransfer.files;
        if (!files.length) {
          return;
        }
        // Read contents of file that's stored on user's computers
        // https://developer.mozilla.org/en-US/docs/Web/API/FileReader
        reader.onload = (e) => {
          this.resume = e.target.result;
          // Prepare form data to be sent via AJAX
          // https://developer.mozilla.org/en-US/docs/Web/API/FormData
          formData.append('resume', files[0]);
          // Async request to upload resume from Laravel backend
          axios.post(`/candidates/${this.candidateInfo.id}/resume`, formData)
          .then(response => {
            this.resume = response.data;
          });
        };
        // Read contents of the file
        // https://developer.mozilla.org/en-US/docs/Web/API/FileReader/readAsDataURL
        reader.readAsDataURL(files[0]);
      }
    }
</script>
In this Vue.js component there’s HTML for uploading the file and rendering the file result if it exists. If the candidate has uploaded their resume already, show it. If the candidate uploads a file read and upload it to the Laravel backend.
Step 2: Create the File Upload endpoint in Laravel
The next step is to define our Laravel endpoint so that candidates can upload files to S3.
That endpoint looks like this in my routes/web.php file. It could easily live in the routes/api.php as well. I’m looking forward to studying through the Laravel, Vue and SPA course on Laracasts.
Route::post(
'/candidates/{user}/resume',
'CandidateController@uploadResume'
)->name('candidates.uploadResume');
In the app/Http/Controllers/CandidateController.php we’re going to check first that the candidate we’re uploading the resume for is the same as whoever has logged in. I store candidate information on the users table. Candidates that login should only be able to upload a resume for themselves!
CandidateController.php
<?php
namespace App\Http\Controllers;
use Illuminate\Http\Request;
use App\User;
use Illuminate\Support\Facades\Storage;
class CandidateController extends Controller
{
    public function uploadResume(Request $request, User $user)
    {
        $candidate = auth()->user();

        // Verify that authenticated user is who we're uploading the file for
        if ($candidate->id != $user->id) {
            abort(403, 'Forbidden');
        }
        // Get file from the request object
        // Returns an instance of UploadedFile
        // https://github.com/laravel/framework/blob/e6c8aa0e39d8f91068ad1c299546536e9f25ef63/src/Illuminate/Http/UploadedFile.php
        $resume = $request->file('resume');

        // Create a human readable file name for storing in the S3 bucket
        $resumeFileName = $candidate->id . '_' . $candidate->first_name . '_' . $candidate->last_name . '_resume.' . $resume->getClientOriginalExtension();
        // Upload file to "resumes" folder in S3 with our file name and publically accessible file visibility
        $filePath = Storage::putFileAs(
            'resumes',
            $resume,
            $resumeFileName,
            [ 'visibility' => 'public' ]
        );
        // Store the file path with the candidate's database record
        $candidate->resume_file_path = $filePath;
        $candidate->save();
        return response()->json($filePath);
    }
}
Laravel has some amazing helper functions. I use the auth helper to check the authenticated user. There’s a helper for getting the request object and route model binding for injecting the user record based on id.
Getting the file from the request returns instance of Illuminate/Http/UploadedFile, which extends a Symphony component called SymfonyUploadedFile. That Symphony component provided the getClientOriginalExtension() method that I use for populating the file extension, like .pdf or .docx or .doc.
I use the Laravel Storage Facade (link to Laravel source code). You’ll see there’s no putFileAs method on the Storage class. This confused me until I read in the Laravel docs How Facades Work.
There’s a getFacadeAccessor method on the Stoage class that returns the name of the service container binding. The putFileAs method lives in the FileSystemAdapter.php class. Laravel source code for that class here.
Once we create an S3 bucket and let Laravel know about our AWS account credentials, this PHP code will upload and store a candidate’s resume!
Step 3: Configure AWS and Laravel
To upload files to S3 we’ll need to set up an S3 bucket and connect Laravel to our AWS account. S3 stands for Simple Storage Service and is one of the fundamental offerings of AWS.
Laravel offers connectivity with S3 more or less out of the box. The filesystem configuration and connection to S3 information lives in the config/filesystem.php file.
It’s best practice to store your AWS credentials in the .env located in the root of the project. Below are the environment variables we need:
FILESYSTEM_CLOUD=s3
AWS_KEY=
AWS_SECRET=
AWS_REGION=
AWS_BUCKET=
Definitely take the time to read the Laravel filesystem docs. In there it lists a couple composer packages you’ll need to install.
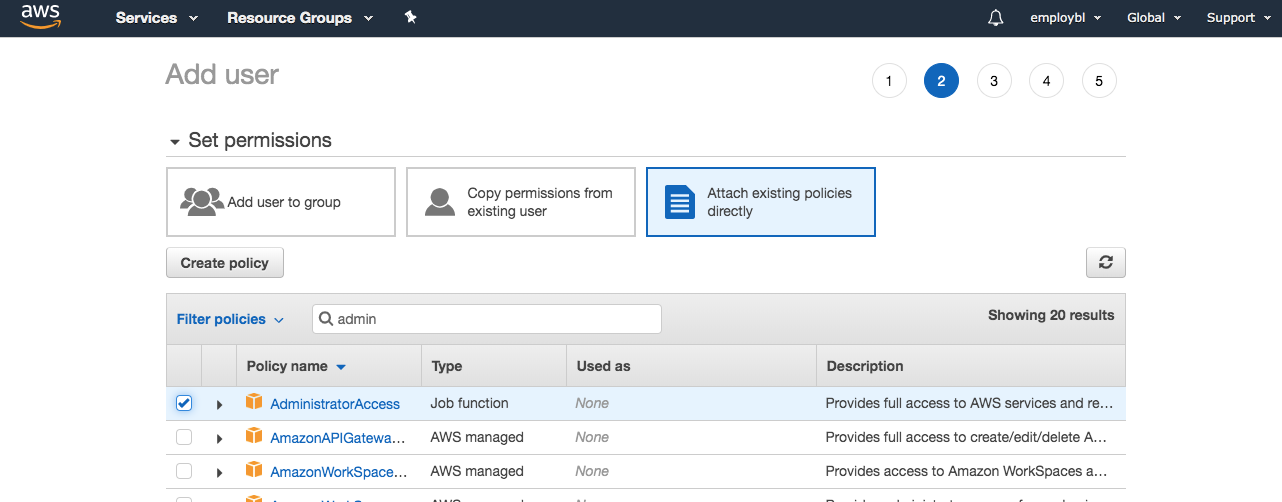
It’s not best practice to use your root account credentials to connect to AWS. Instead, create a user through the AWS Identity Access Management (IAM) dashboard.
I created a user with my username and gave myself administrator access:

Once the user is created use these values to populate the AWS_KEY and AWS_SECRET values. The bucket name and region we’ll populate after creating our S3 bucket for the filesystem.
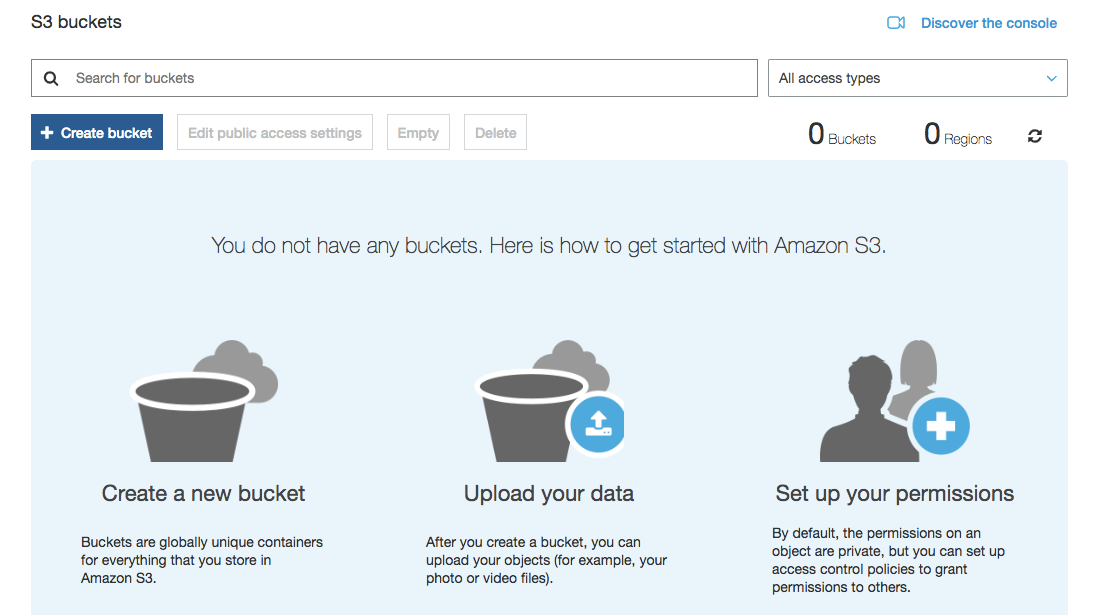
Log into the AWS console and create a new S3 bucket.

Once I created a new S3 bucket I added a folder in the bucket called “resumes”.
Update the AWS_BUCKET and AWS_REGION with the appropriate values.
For the AWS region, look at this list of AWS region shortcodes. In my case I selected “US West (N. California)” when creating the bucket. Then in my .env file I put AWS_REGION=us-west-1.
Step 4: Render file to Candidate Profile with Laravel Blade
I render the candidate profile for recruiters to see using Laravel Blade. Using Blade I conditionally render an iFrame if the candidate has uploaded a resume.
If they haven’t uploaded a resume express that.
Conclusion
That’s about it! If you have any questions or run into trouble hit me up on Twitter.
Feel free to apply to Employbl as a candidate click here. You can use Employbl to find job opportunities or startup and tech companies in the Bay Area.
Employers can browse approved candidates (and their resumes) after applying here. There are no hiring fees. I haven’t started charging employers for network access at all. It pays to be an early adopter!
Thanks for reading. If you enjoyed the post consider sharing with your friends or social network 💯
Suggest:
☞ Laravel Tutorial - Abusing Laravel
☞ Restful controllers in Laravel
☞ Learn GraphQL with Laravel and Vue.js - Full Tutorial
☞ Complete Employees Management Tutorial - Laravel 8 With Vuejs - Full Laravel 8 Course