Building a Gas Pump Scanner with OpenCV/Python/iOS

Last year I took the Coursera course on Machine Learning and one of my goals in taking that class was that I wanted to use something learned from that in one of my personal projects. Back in 2012, in an exercise in learning iOS development, I released a Gas Tracking App named FuelMate in the iOS app store. You can use the app to track your gas mileage over time and has some fun features like an Apple Watch app, vin.li integration, and visuals based on your trending mpg.

I had a new idea for it, how about adding a feature that instead of typing in the fuel information into the app, you could just scan it directly from the pump? Let’s dive into how we can make that happen.
Technology
Rather than starting with updating the iOS application, I wanted to prove it out using something easier/faster. I decided that my first goal of this project was to write a simple Python app to take an image of a gas pump, and try to read the digits from it. Once I’ve proved out the idea, I’d then work on integrating that into iOS.
OpenCV is a popular cross platform library used for Computer Vision applications. It includes a wide variety of image manipulation utilities as well as some Machine Learning functionality. Since it’s cross platform, my hope was that I could prototype this in Python first, and then convert the processing code into C++ to run on the iOS app.
My Python skills aren’t very advanced, so this was also a learning exercise in Python. I’ve released all the Python code I’ve written for this project on GitHub. This article isn’t a technical code review of the code, but rather a high level writeup on the thought process going into this project.
Goals
Before touching anything in the iOS code, I had two main ideas to prove:
- Can I isolate the digits from the image?
- Can I determine which digit the image represents?
Once I’ve validated these two, I’d then invest the time in updating the iOS app. Historically anytime I touch my iOS apps, it turns into a much larger time investment than I usually expect.
Digit Isolation
There are multiple ways in how you can determine the digits in the image, but I set forth using simple image thresholding to attempt to find the digits.
The basic idea of image thresholding is that you convert the image to grayscale, then say that any pixel where the grayscale value is less than some constant, then that pixel is one value, otherwise it’s another. In the end you have a binary image that is just two colors, which in most cases is just black and white.
This concept is very effective in OCR applications, but the main problem is deciding on what to use for that threshold value. You can either pick some constant, or with OpenCV, you have a few additional options. Rather than use the constant, you can use adaptive thresholding, this will use smaller portions of the image and determine different thresholds to use for you. This is extremely useful in applications with different lighting situations, especially in scanning gas pumps.
Once you have the image thresholded, you can use OpenCV’s findContours method to find areas of the image that have connected sections of white pixels. Once you have the contours, then you can crop out those areas and determine if they might be a digit and what digit it is.
Basic Image Processing Flow
Here is the original image I used in testing the image processing. It has a few glare spots, but is a fairly clean image. Let’s step through the process of taking this source image and try to break it down to the individual digits.
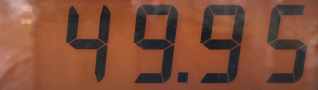
Image Prep
Before starting the image manipulation flow, I decided to adjust some of the image properties before continuing. This was a bit of trial and error, but I noticed that when I adjusted the exposure of the image, I was able to get better results. Below is the image after I adjusted the exposure(alpha) using the Python equivalent of cv::Mat::convertTo which is just a multiply action on the image mat cv2.multiply(some_img, np.array([some_alpha]) You can see the code here

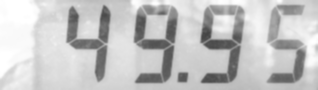
Grayscale
Convert the image to grayscale.

Blur
Blur the image to reduce the noise. I tried a bunch of different blur options, but found the best results with just a mild blur.
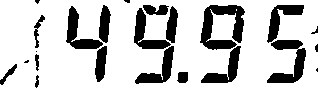
Threshold the image to convert to black and white
In the image below, I’m using the cv2.adaptiveThresholdmethod with the cv2.ADAPTIVE_THRES_GAUSSIAN_C option. This method takes in two parameters, block size and a constant to adjust by. Determining these two took some trial and error, more on that below in the optimization section.
Fill the gaps
Since most fuel pumps use some kind 7 segment lcd display, there are slight gaps in the digits that won’t work with the contouring method, so we need to make those segments seem connected. In this case, we’re going to erode the image to connect those gaps. That may seem backwards, since you might expect to use dilate , but those methods typically work on the white sections of the image. In our case we’re ‘eroding’ away the white background to make the digits seem bigger.

Inverse the Image
Before we try to find the contours in the image, we need to reverse the colors because the findContours method will find connected sections of white and currently the digits are black.

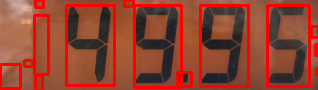
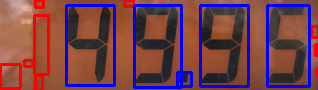
Find the contours on the image
The image below shows our original image with bounding boxes around each of the contours it found on the image above. You can see that it found the digits, but also a bunch of things that are not digits, so we’ll need to filter those out.
Contour Filtering
Now that we have a bunch of contours, we need to figure out which contours we care about. After looking through a bunch of gas pump displays and scenarios, I came up with a quick set of rules it’ll apply to the contours.
- Collect any square contours that we’ll classify as a potential decimal.
- Throw out anything that’s not a square or a tall rectangle.
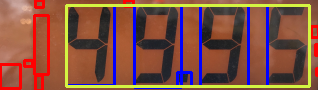
- Match contours with certain aspect ratios. Nine of the ten digits in an LCD display would have an aspect ratio similar to one of the blue box highlights below. The exception to that rule is the digit ‘1’, which has a slightly different aspect ratio. By using some sample contours, I determined the 0–9!1 aspect as
0.6and the 1 aspect as0.3. It’ll use those ratios with a +/- buffer to determine if the contour is something we want, and collect those contours. - Apply an additional set of rules to the potential digits where we’ll determine if the contour bounds deviates from the average height or vertical position of all the other potential digits. Since the digits should be the same size and lined up on the same Y, we can throw away any contours that it think is a digit, but not lined up and sized like the others.
Predict
With two buckets of contours, one with potential digits and one with potential decimals, we can crop the image with those contour bounds and feed those into a trained system to predict it’s value. More on that process below in the ‘Digit Training’ section.

Find the Decimal
Finding the decimal in the image is a bit of a different problem to solve. Since it’s small and sometimes gets connected to the digit next to it, it seemed problematic to determine it using the method we used on the digits. When we filtered the contours, we collected the square contours that could be a decimal. Once we have our validated digit contours from the previous step, we’ll find the leftmost x position of the digits and the rightmost x position, to determine the space we’d expect a decimal. Then we’ll loop over those potential decimals, determine if it’s in that space and in the lower half of that space and classify that as the decimal. With the decimal found, we can then insert that into the string of numbers we’ve predicted above.
Digit Training
In the world of Machine Learning, solving an OCR problem is a classification problem. We build up a set of trained data, for example the digits from the image processing, classify them as something, and then use that data to match any new images. Once I got the basic image isolation working, I created a script that could loop over a folder of images, run the digit isolation code, and then save the cropped digits into a new folder for me to review. After that ran, I’d have a folder of untrained digits that I could then use to train a system.

Since OpenCV already included a k-nearest neighbor (k-NN) implementation, I figured I’d give that a try at first, so I wouldn’t have to bring in any additional libraries. In order to train that, I went through the folder of digit crops and then dropped them into new folders labeled 0–9, so each folder had a collection of different versions of the number in it. I didn’t have a ton of these images, but had enough to prove this would work. Since these digits are fairly standard, I don’t think I’d need a ton of trained images to be fairly accurate.
The basics of how k-NN works is that we’ll load up each image in black and white, store that image in an array where each pixel is either on or off, and then associate those on/off pixels with a specific digit. Then when we have a new image to predict, it’ll figure out of which of the trained images has the closest match of these pixels, and return us the value that matches the closest to.
Once I had my digits organized, I created a new script that would traverse those folders, take each image and associate that image with a digit. In most of the code so far, the general image processing concepts are applied the same in both Python and C++, but here is where I came across a slight difference.
In most Python examples of this type of application, the classifications are written to two files, one containing the classification, and the other containing the image contents for that classification. This usually done with NumPy and standard text files. However, since I wanted to reuse this system on my iOS application, I needed to come up with a way that I could have cross-platform classification files. At the time, I couldn’t find anything to do this, so ended up writing a quick utility that will take the classification data from Python and serialize that into a JSON file that I could use on the C++ side with OpenCV’s FileStorage system. It’s not pretty, but I wrote a simple Mat serialization method in Python that’ll create the proper structure for OpenCV to read on the iOS side. Now when I train the digits, I’ll get the NumPy files for use in my Python testing, and then a JSON doc I can drag into my iOS application. You can see that code here.
Optimization
Once I validated my two goals of digit isolation and prediction, it was a matter of optimizing the algorithm to predict digits on new images of pumps.
Manual
During the initial phases of optimization, I created a simple playground application that uses some of the simple UI components that OpenCV provides you. With these components, you can create some simple trackbars to slide around and change different values and reprocess the image. I created a little wrapper around the cv2.imshow method that would tile the shown windows because I got sick of always repositioning them, you can see that here.
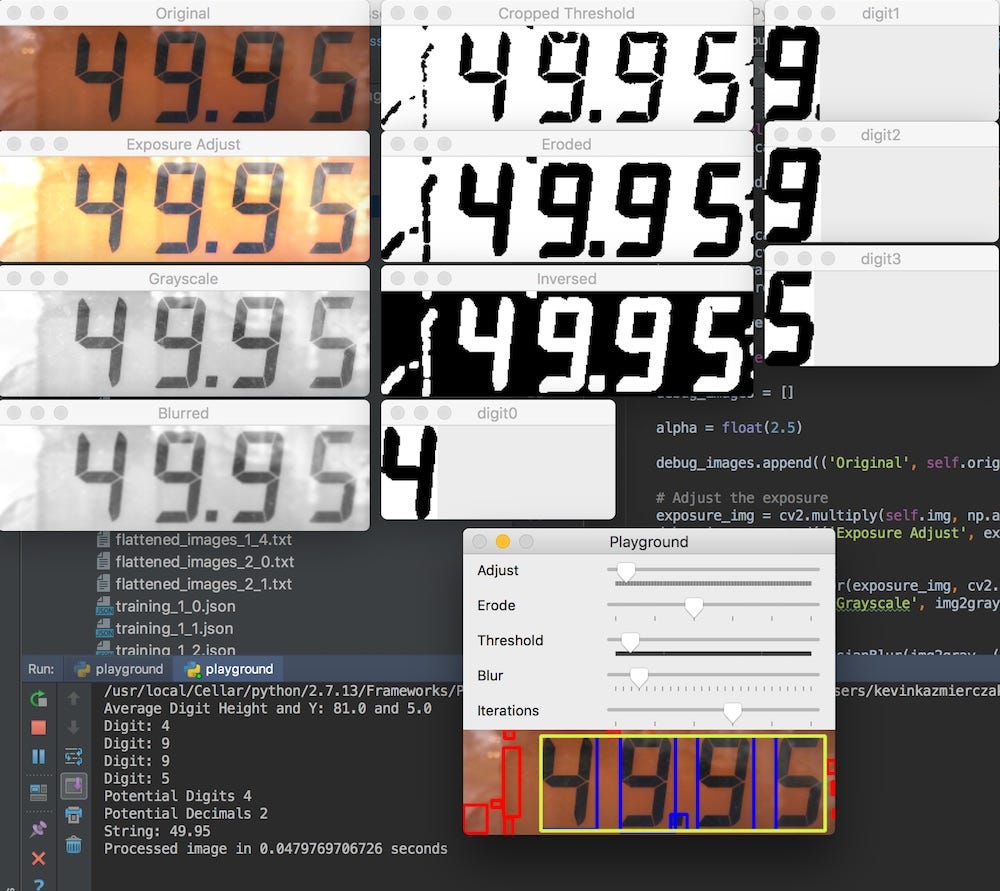
Using the playground, I was able to load up different images and try out different variations of the variables in the image processing and determined what I thought was the best combination. This got me close, but I wanted to validate these parameters more systematically.
Automated
Testing the different variables on each image was a good way to get started, but I wanted a better way to validate that if I changed the variables for one image, if that would have an affect on any of the other images. To do this, I came up with system to do some automated tests against these images.
I took each of my test images and put them in a folder. Then I named each file with the digits I expected in the image, using an ‘A’ for the decimal point. Then the application could load up each of the images in that directory and predict the digits and then compare that against the digits from the filename to determine if it was a match. This allowed me to try out my changes quickly against all the different images.

Taking this a step further, I created a different version of this script that would try out almost every combination of variables for blur, thresholding, etc on this set of images and figure out what the most optimized set of variables would be that had the best accuracy. This script took quite a bit longer to run, around 7 hours on my machine, but in the end came up with a different set of variables that I didn’t find when I tested it manually.
iOS Conversion
With the process and code working in Python, it was time to convert this logic over to C++ (technically Objective C++) so I could embed this logic in my iOS application. Thankfully most of the code is really easy to port from Python to C++ since a lot of the methods and signatures are all the same. One of the main differences being that in C++ the methods operating on an Image Mat work on a pointer to the image where the Python code returns an image instead.
I won’t go into all the details of how to connect the iPhone camera to the image processing, but the basic idea is that you can use the AVFoundation classes to setup an AVCaptureSession that will take input from the phone camera and stream the pixels to a buffer delegate where you can run your processing logic. This processing typically happens on a dispatch queue to avoid blocking your main thread.
In my app’s code, I take the raw pixel data and pass that into the processor that will end up returning a predicted digit string, an optional raw image after processing for debugging, and a basic confidence level of it’s prediction. Once it’s fairly confident with a value, it’ll display that on the screen.
One note on the usability in the implementation is that in order capture the digits, the user has to tap a button on the screen. I noticed in testing that the movement of your hand to hit the button sometimes would cause the digits to recalculate and you might end up with digits you didn’t want. So rather than take the digits from the point when you press the button, the code will take a running average of the most calculated value over the duration and display that one. This helps with any sudden movements that occur when you tap the button to save and also avoids a constant jitter of readings while the processor is running.
Here is a quick clip of the app running:
Conclusion
Whether or not this is a feature that anyone will actually ever use is yet to be determined, but it was a fun exercise in implementing some of the Machine Learning concepts and playing with OpenCV. Since I work from home, I don’t actually fill up my car very often, so I haven’t tested this a ton in the real world, but in the app you can send me your fuel pump images if the scanning doesn’t work and I can try to make it better in the future.
So far in my testing the biggest issue the app has is with the glare on the pump display. Depending on the lighting at the pump and the angle of the phone can lead to some scans that just don’t work. I’m still working on the best way to handle those issues.
For future releases, I’d love to be able to scan the entire pump display at once, and then find the digits and split them automatically into cost and amount. Due to the differences in pumps, it’s not always consistent where these numbers are and are sometimes in individual lcd panels.
I’m still messing with different ideas to isolate the digits, but figured I’d share what I have so far and see how it goes. Maybe there are much better ways to do this; if you know of any tips/tricks, let me know!
Further reading:
☞ Python GUI Tutorial - Python GUI Programming Using Tkinter Tutorial
☞ TensorFlow Variables And Placeholders Tutorial With Example
☞ Top Python IDEs for Data Science in 2019
☞ 9 Tips to Trigger a Great Career in Machine Learning
☞ Learning Model Building in Scikit-learn : A Python Machine Learning Library
Suggest:
☞ Machine Learning Zero to Hero - Learn Machine Learning from scratch
☞ Complete Python Tutorial for Beginners (2019)
☞ Learn Python in 12 Hours | Python Tutorial For Beginners
☞ Python Machine Learning Tutorial (Data Science)